How to Manage Points(for Administrators)
Administrators can transfer points between administrator wallets and user group wallets.
This section explains how to check wallets and the procedures for transferring points.
1. Checking Wallets
This section explains how to check the status of wallets held by administrators and wallets allocated to each user group.
In TailorNode, multiple wallets exist for managing points. Each administrator has one administrator wallet, and one group wallet is automatically created for each user group. These wallets function as respective point holders.
- The administrator wallet is automatically created when TailorNode service starts.
- Group wallets are automatically created when a new user group is created.
Open the 【Point Wallets】 screen from the 〈Setting〉 menu on the left.
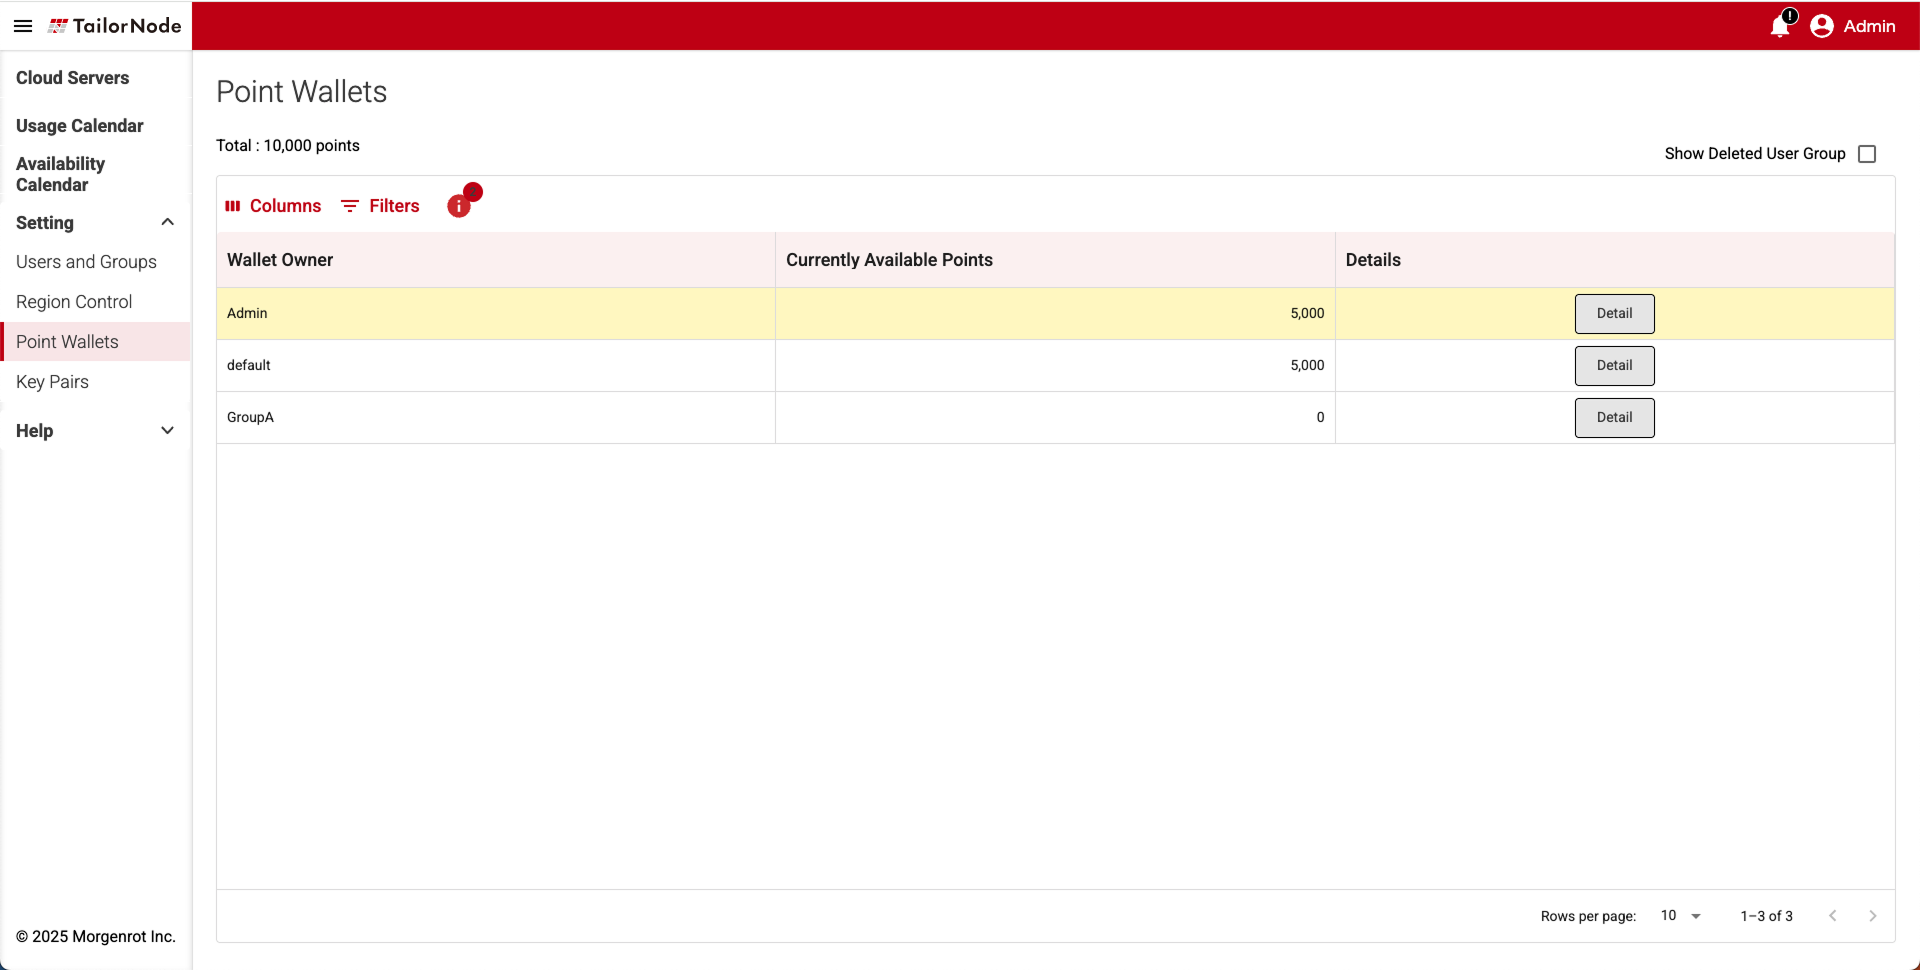
From the displayed wallet list, you can check the status(e.g., point balance)of the administrator wallet and each group wallet.
「Total:」 showing the total points across all wallets is displayed at the top of the screen.
Example: In the screen below, the administrator wallet(Admin)has 10,000 points, and the group wallets(default, GroupA)all have 0 points. 「Total:」 at the top of the screen shows 10,000.
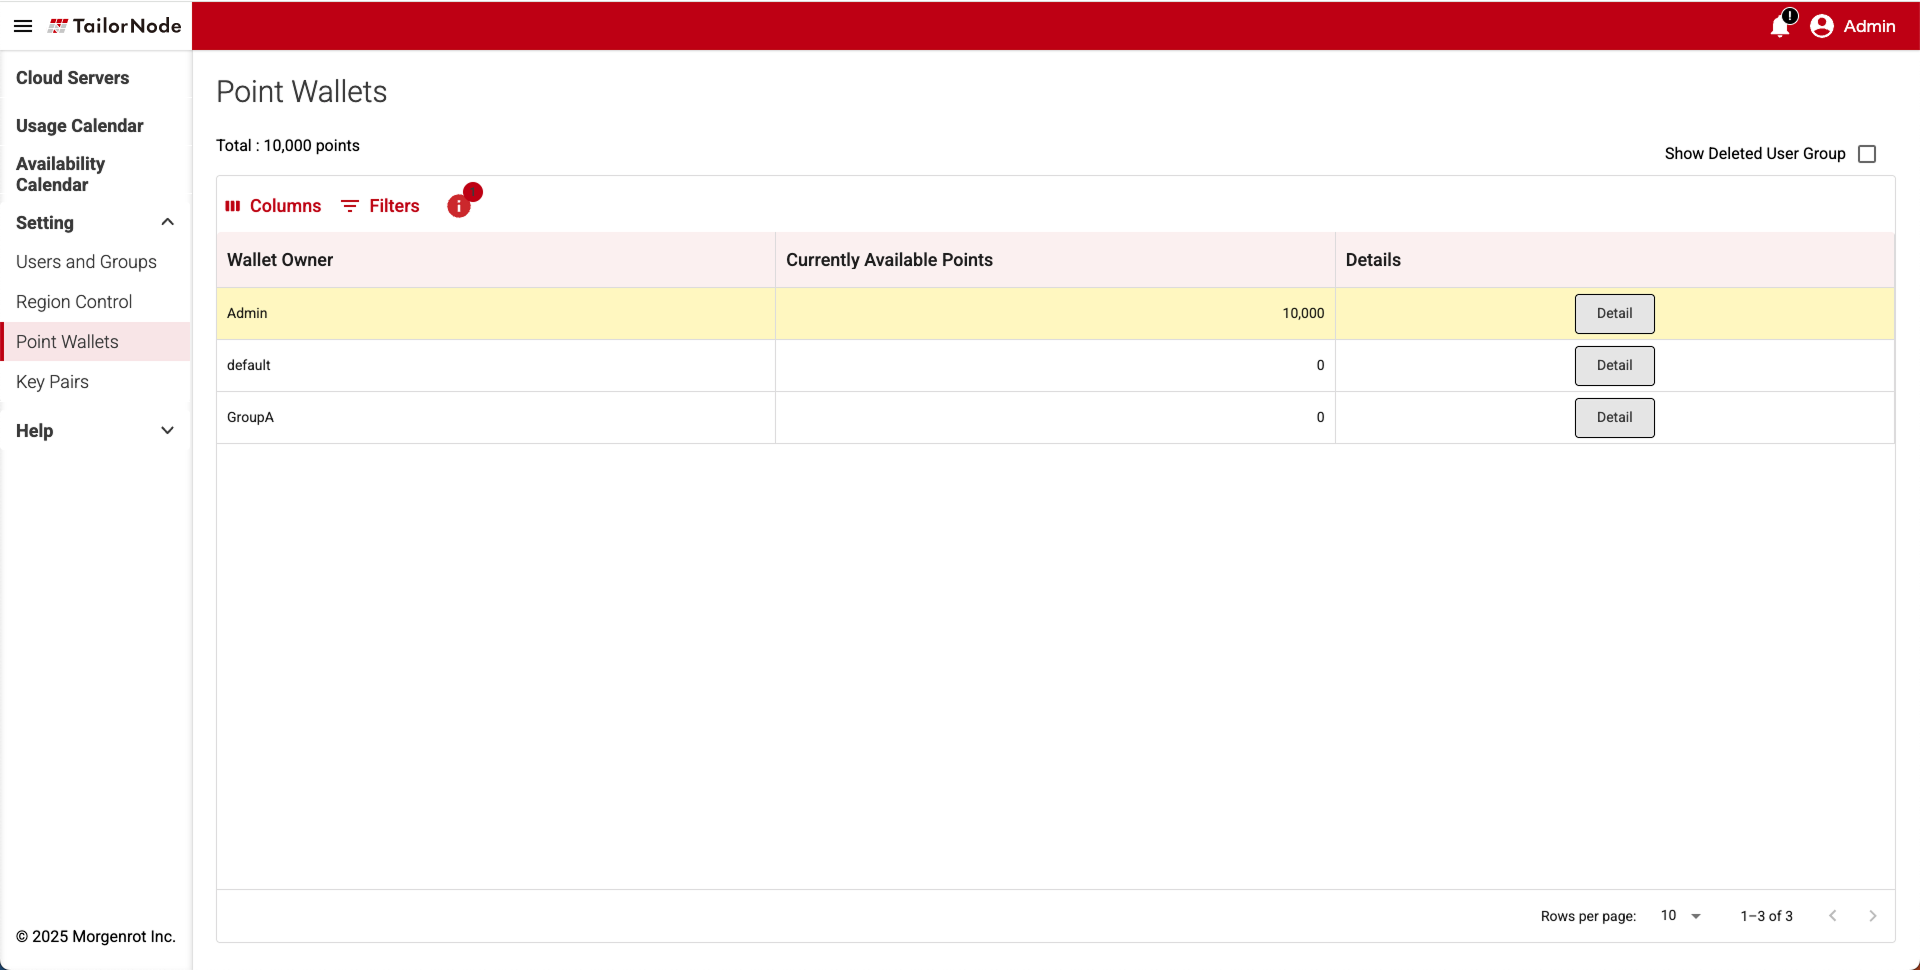
| Item | Description |
|---|---|
| Wallet Owner | The owner of the wallet. Either Administrator Wallet(Admin)or each user group will be displayed. |
| Currently Available Points | The current number of points held in the wallet. Cannot be negative. |
| Details | The[Detail] button. Displays wallet details. |
- Clicking the [Detail] button for a wallet displays the 【Wallet Detail】 screen, where you can check detailed information such as the point transfer history for that wallet.
The 【Wallet Detail】 screen displays the following information:- At the top of the screen, three items are displayed: Wallet Detail:(Wallet Name), Balance:(Point Balance), and [Point Transfer] button.
- At the bottom of the screen, a history list of past point transfers is displayed.
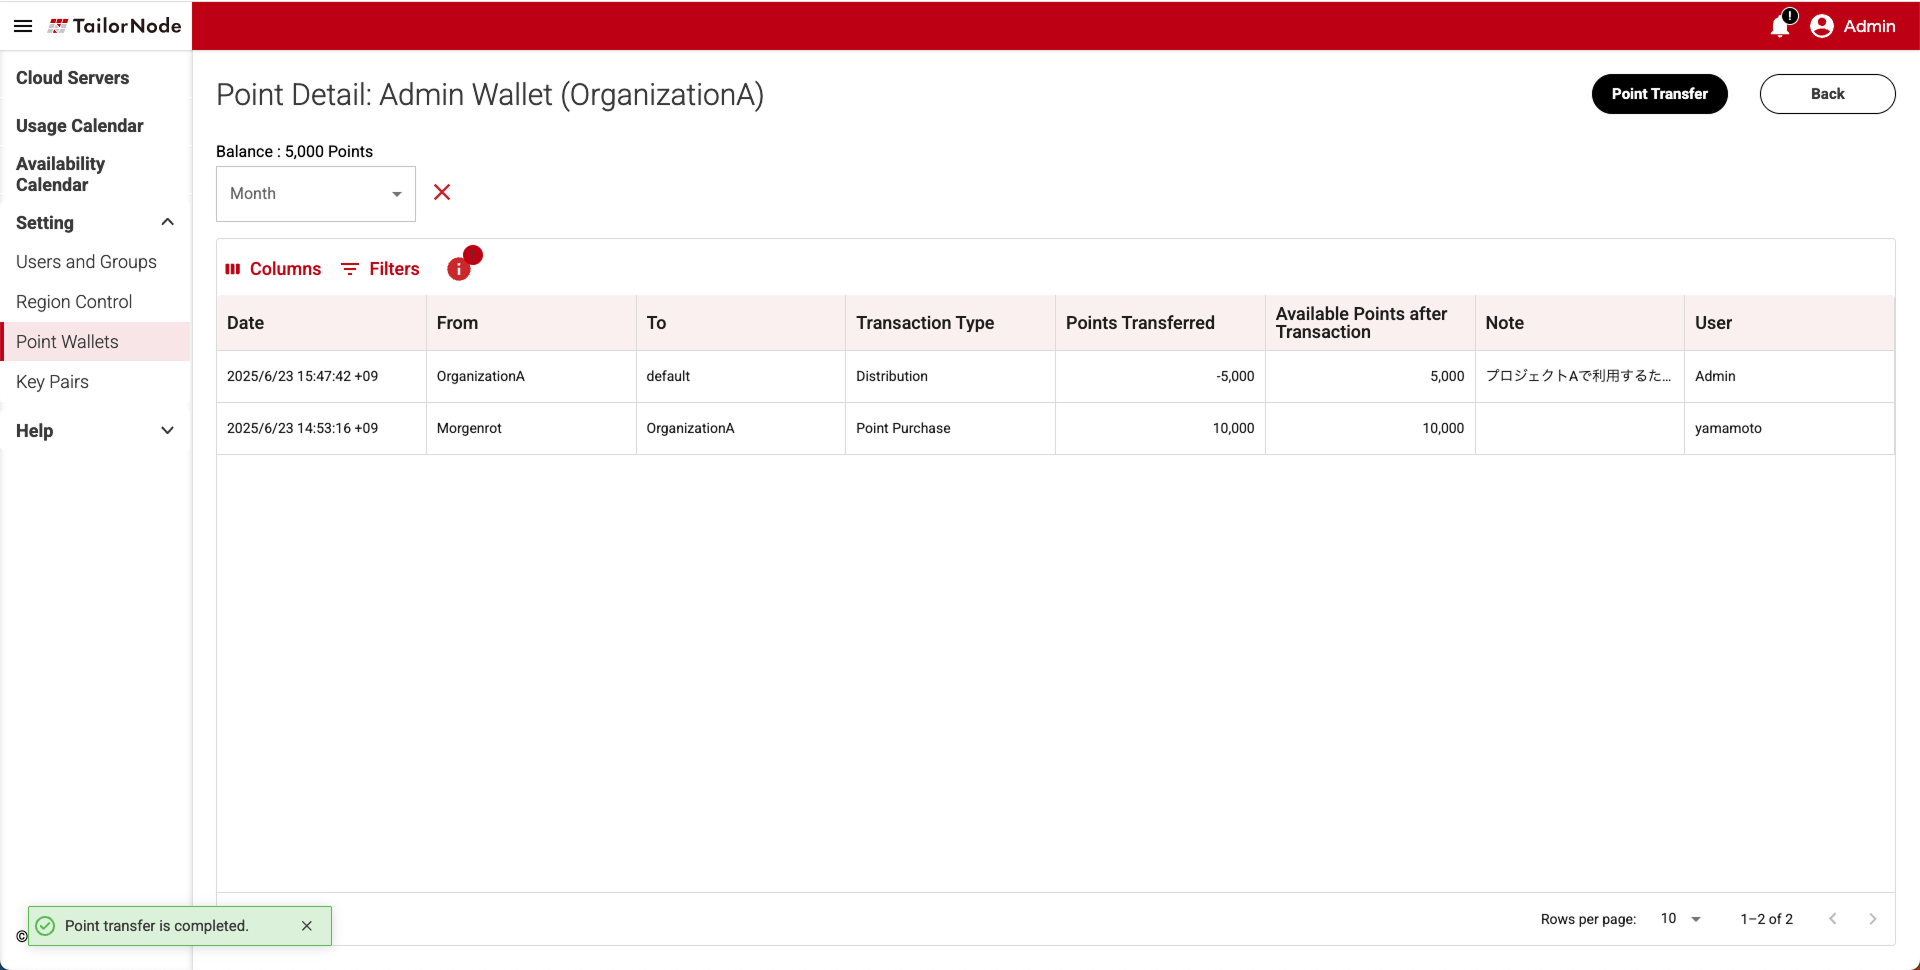
The history list displays the following items.
| Item | Description |
|---|---|
| Date | Point transfer processing. The date and time of payment or receipt are displayed. |
| From | Point source. |
| To | Point recipient. |
| Transaction Type | Type of transfer. ・Point Purchase: Point purchase ・Withdrawal: Collection(e.g., by cancellation) ・Refund: Refund(e.g., by cancellation) ・Distribution: Point transfer from administrator wallet to user group wallet ・Reserved: Points consumed by reservation ・Consumed: Points consumed by startup ・Collect back: Point transfer from user group wallet to administrator wallet ・Point Expired: Expiration due to point expiry |
| Points Transferred | Number of points transferred. |
| Available Points after Transaction | Point balance in the wallet after the transfer process. |
| Notes | Remarks field. |
| User | Executor of the transfer process. For Point Purchase, Our company is displayed; otherwise, the name of the administrator who performed the operation is displayed. |
TIPS!
- When you reserve a login server or compute server, it will be displayed in the history as 「Reserved」.
- When the usage start time is reached, the server will start, and 「Reserved」 will be updated to 「Consumed」.
2. Transferring Points Between Wallets
This section explains the procedure for transferring points between wallets.
NOTICE!
Initial points are assigned to the administrator wallet.
To reserve and use the login and compute servers, points must be transferred from the administrator wallet prior to use, as points are required in the target user group wallet.
2.1 Point Transfer Procedure
Administrators can transfer points from the administrator wallet to any user group wallet.
From the list on the 【Point Wallets】 screen, click the [Detail] button for 「Admin Wallet」.
On the 【Wallet Detail】 screen, click the [Point Transfer] button in the upper right corner.
The 【Point Transfer】 pop-up screen will appear, so fill in the required information.
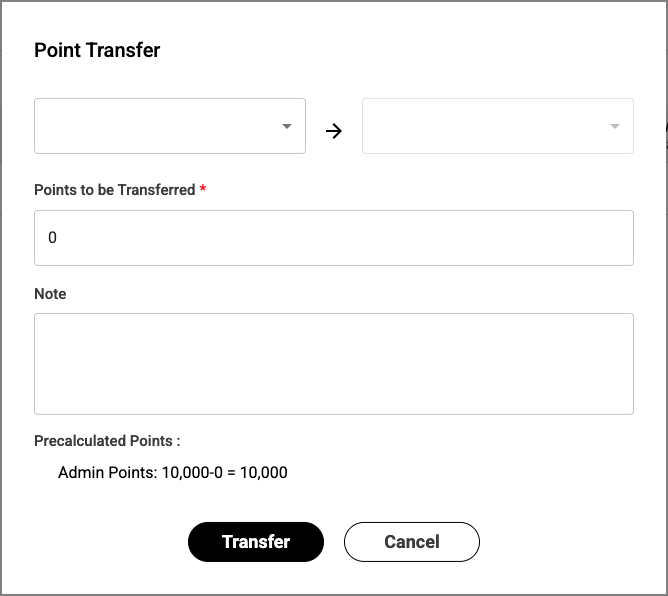
The 【Point Transfer】 pop-up screen displays the following input fields:
| Item | Description |
|---|---|
| Point Transfer | Enter in the format 「Point Source → Destination」. |
| Points to be Transferred | Enter the number of points to be transferred(negative values not allowed). |
| Notes | Enter remarks. The entered content will be displayed in the history. |
| Precalculated Points | Displays the balance after transfer(source/destination)in advance. Displayed according to the entered 「Points to be Transferred」 content. |
TIPS!
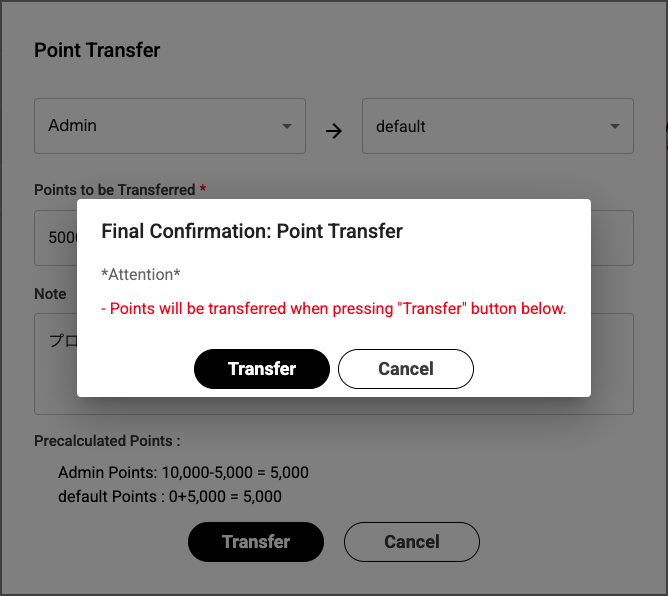
Example: When transferring 5000 points from the 「Admin Wallet」(administrator wallet)to the 「default wallet」
Point Transfer Admin → default Points to be Transferred 5000 Notes Grant points for server use Precalculated Points Admin Points : 10,000-5,000 = 5,000
default Points : 0+5,000 = 5,000
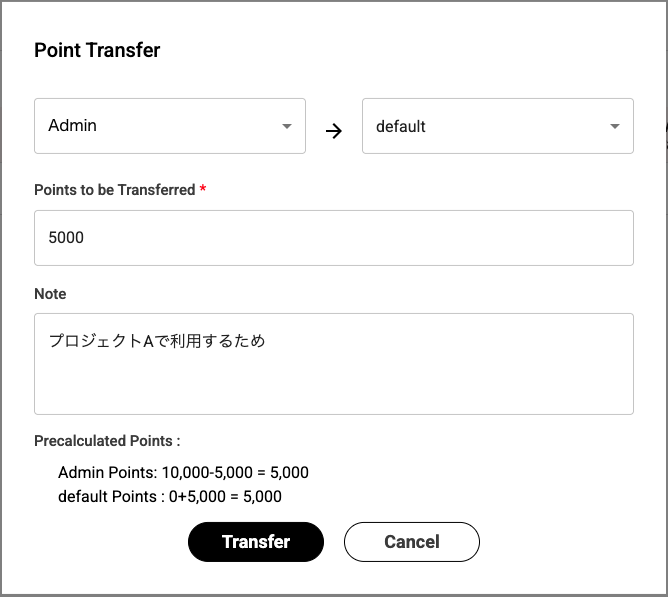
Confirm the entered content and click the[Transfer] button.
The 【Final Confirmation: Point Transfer】 pop-up screen will appear.
Confirm the precautions, and if there are no issues, click the [Confirm] button to execute the transfer process.
2.2 Confirmation of Transfer Results
When the transfer process is completed, the screen will return to the original 【Wallet Detail】 screen.
In the example given in the TIPS above:
- A new transaction related to this point transfer will be added to the history list and displayed as 「Distribution (Administrator → User Group)」.
- On the administrator wallet side, 「Points Transferred」 will show -5000, and on the user group wallet side, it will show 5000.
Also, from the 【Point Wallets】 screen, you can confirm that the point balances of each Admin and default wallet have changed(e.g., Admin 5,000 / default 5,000).
TIPS!
For operating conditions of points and wallets, please refer to About Points and Wallets .